Showing posts with label diy. Show all posts

Crochet Finger puppets: Girl and Cat

finger puppets

I've made these for my daughter's birthday. This is my own design, and I tried to write down the pattern as I was working on them, so I could make more puppets later. And so I could share with you, of course. :-)

Here's the pattern. I've never wrote a pattern before, so I hope it makes sense. Let me know if you have any questions. 
View the pattern

Hope you like them.
You can't post it, reproduce or sell the pattern without my permission; you can't use it to make toys for sale. Thank you.


Monte-LEGO (or LEGO-sori)

Kiddo did a huge progress in reading, so I decided we need to do a math activity for a change. And I had an epiphany: why not use LEGO bricks to make manipulatives. So, here you are: "Golden beads" activity made of LEGO single bricks. By the way, many non-Montessori schools use similar counting activities using math rods.

You need nine single units and nine 10-bars. You can also make a 100-square. (PS: The bricks are smooth and you can't feel where one ends and another begins, as with beads. So using the bricks of different colors makes it easier for a child to count them if she wants to check her answer.)

There are a lot of activities that you can do with them:
- counting. 1_2_3...9 (on single beads, then goes a 10-bar) 11_12... etc.
- count by 10.

- make up 2-digit numbers: first ask a child to make a number for you; when she's comfortable with that ask her to "read" a number you made. Then you can mix the rods with the decimal number cards to teach the child the formation of complex numbers and the matching quantity. These activities also form an impression of the hierarchy of numbers, place value, and the role of zero in determining place value.

- adding numbers without carrying over: for example here's how you do 11+12=?
make 11 (one 10-bar and one single bead) , make 12 next to it. Add 10-bars = two 10-bars = 20. Add single beads = three beads = 3. Make up the number = 23. This makes addition very concrete for small kids.
-same for subtraction.

-addition with carrying over is a bit more complex but it's also do-able. But I like using plain sticks for this.

door stopper

Here's a little hack I came up with. It serves two purposes:
a) it keeps the lamp cord in place (to prevent the lamp from being accidentally pulled down);
b) it is a door stopper; it prevents the door handle from slamming into the edge of the bookcase.
Cheap. Easy. It works.

homemade plant-me paper

We got a little seed infused plant-me card recently, and it gave me an idea that it should be easy to make them from scratch at home. You just need to make paper and add seeds into it. Easy-peasy!

I have a Paper recycling kit, that I bought a few years ago on clearance. But any old blender or mixer will suffice. I may want to purchase a cheap one at the garage sale or a thrift store as it's not a good idea to use a blender you use to make your smoothies. If you are using a paper making kit - use the tools and follow the directions that came with it. But you can also make your own frame by attaching fine mesh (like window screens) to a wooden frame.

Get your ingredients. I once make paper from dryer lint. It worked! Lint paper is very soft, felt-like and would disintegrate as soon as you get it moist. But for plant-me cards I want sturdier paper. So, I got some napkins and a handful of shredded paper. You can also use construction paper, egg cartons, newspapers - most any kind of paper, other than glossy magazines. You need to cut it into small bits, or use a shredder.
Theoretically, torn paper is better as it absorbs water faster, but shredded paper worked very well for us. As for the seeds, any small flat seeds will work fine.

Make pulp. Next put your paper bits into a bowl of hot water and leave to soak for several hours or overnight. Use a blender to puree the wet paper.

Gather pulp onto the screen. Pour the paper pulp into a tub. Slip the frame into the tub and gather a nice layer of pulp. We wanted to make thicker paper, and the result was a paper that was almost as thick and sturdy as an egg carton.

Add seeds. While the frame is still in the water, sprinkle the seeds on top of it, tap them in gently. You could have added the seeds to the pulp before pouring the mixture into the tub. We used very small seeds -Black-eyed Susan- and it was easier to sprinkle them over the paper. Also, no seeds get wasted this way.

"Wring" and dry the paper. Lift the frame up. Let it drip. Put a washcloth over the frame (or flip the frame over onto the dishtowel, whichever is easier for you). Using a sponge, gently press out as much water as you can. Peel the paper sheet off the frame and off the towel, put it on the paper towels. Let it dry undisturbed for 12-24 hr. And you can reuse or recycle these towels later.
We found that drying it on the paper towel gives you a flatter paper vs hanging it to dry.

Now you can cut your new paper into shapes, make cards using it. And don't forget to include the planting instructions before you give them to your friends.

thrifty Holidays 101: garland

Gingerbread men garland from mailing paper
This was my favorite cutting activity when I was in kindergarten. You can say, that I was abscessed with folding the paper, drawing 1/2 silhouettes and cutting them, unfolding to see what I've got.

It's super easy. If you woke up and remembered that you were in charge of classroom decorations, and the party is today - you can still make it! Here's how to.

1) Find a piece of paper that's as long as you want your garland to be. Note, that if your garland is longer that 10 Gingerbread men, it might be too difficult to cut through that many layers of paper.  
2) Decide how wide you want your design to be. 
3) Fold the paper back and forth like accordion (fan fold). Draw your design on the top layer. You can either draw the whole Gingerbread man or just a 1/2 of it.  Make sure their hands are touching at the folded edge. If you're making a very long garland, you can make a wider folds and draw 2 men, or Gingerbread man and a Snowman.
4) Cut out your garland, being sure not to cut the fold lines under the hands.
5) Open up the garland. 
6) Iron it with a hot iron with steam turned off.
7) For extra credit, decorate the Gingerbread men. 

Very easy holiday cards

Here are two simple ideas for Holiday cards your 3-5 yo can make with minimum help. Another hidden benefit of kid-made card is that they are so cute you don't have to write a message! A simple "Happy New Year" scribbled by your preschooler is more than enough.


Draw (or have your child draw) a simple tree shape (a triangle over a small rectangle).

Cut construction paper (scraps left over from some other project are perfect) into tiny pieces, the smaller the better.

Starting at the bottom of the tree, apply glue row by row, put the paper pieces on, apply more glue, keep going until you're done.

Draw a tree-topper or make one from paper pieces.

Scribble a short note inside the card (write it on a piece of paper so your child could copy it).

Make as many cards as you need. Mail them to friends and family.


And here are the cards we made last year (with almost-4-yo.).

Scribble a snowman (or a Xmas tree). Use the stick-on foam mosaic pieces to decorate it.

What's that number?

Little N., who is 4.5yo, can count from 1 to 100, she understands the value of the numbers (like 10 is less than 100), she also knows the names of 100s (one hundred, two hundred, etc); what she can't do is count by 1 from 100 on (101-102-103, etc) or to name the 3-digit numbers (123 is not called "one-two-three"). So, to help her learn that I've made a home version of Montessori Decimal Cards. You can buy them for $20 plus shipping, but the fact is, that for many activities you need more than one set, and then it becomes too expensive.

I've printed out mine on a regular paper for now before I get the time to make the cards from the Sturdy Board. You can also either glue the print-out onto the card stock, or laminate it.

Before you begin, make sure that your child can name all the 100s, 10s and single digit numbers. Or use the cards to teach her what they are called. This is a first step. You can use the decimal cards in many ways, but I'll only tell you about one "game" today. It's primary purpose it to help the child figure out the concept of naming 3-digit numbers.

He's how you do it. First, show the cards to the child. Ask her to name them. Start with ones, then do tens and hundreds. If she gets bored quickly, then randomly draw some cards out and ask her to name them.

Next tell her that you are going to make some numbers and learn how to name them. The numbers on the cards are color coded (all the 100s are red for example, and 10s are blue). Take one of the 10s card [50, e.g.], put it down and say [50]. Then take a single digit one [4 e.g], put it on top of the 10s card so it covers the 0 [say "4"]. Say [54]. Now ask your child to make and name a 2-digit number.

Now do the same thing but using the 100s, 10s and 1s. If your child says 2 instead of 200, take the top cards off and show her the bottom card. Say: "this card is called 200, not 2. You should say the name of this card". Do groups of numbers like 101, 110 and 111 (pattern wise). Note that the numbers like 213, 314 (the ones that have teens in them) might be more difficult to decode.

Don't forget to praise your child's efforts. Practice this game a few times, and you'll be amazed how quick she'll learn it.

The video of little N. calling out the numbers is coming soon. And also the template so you could make your own set.

Cookies and Shrinky DInks.

Imagine the kids disappointment when they've been promised a trip to the beach but woke up to a rain. But apparently, once they heard "Let's bake some cookies", they forgot all about the beach and the rain.

And so we've made some vegan allergen-free chocolate chip cookies (for a 4yo who's allergic to milk and eggs) and some walnut puffs (also vegan, btw) for everyone else. From scratch. We used up all the flour, butter, nuts, colored sugar that we had in the house.
Oooh, yum yum. These melt in your mouth. I don't even mind setting the smoke alarm off. Something is wrong with this wax paper, it starts to smoke very fast...

Then the kids got another surprise treat - Shrinky Dinks. I collect the tops and bottoms from the take-out containers made from #6 plastic, and that's what we used. They got out Sharpies, drew some pictures, and, armed with a flashlight, set in front of the oven window watching their creations bubble and flatten again. They called it a "magic show" and were super impressed. And here's a little how-to, if you've never done shrinky dinks before.

Take a piece of #6 plastic (or a special shrinky dinks plastic sheet), cut it into a desired form. It should be 2:1 or 3:1 in size (meaning that the result will be 2 or 3 times smaller than the original). Don't worry about the colors being dull as they will get more vivid after "baking".

Bonus: If you have older kids, you can ask them to measure their shrinkies before and after and calculate how much they've shrunk. 

Decorate it using permanent markers. This is a picture of our cat as drawn by my 4yo daughter.

Put it on a sheet of aluminum foil and into a hot oven, 300-350F works fine.

Watch it carefully. The "baking" only takes a couple of minuted. Enjoy the "magic show".

Take it out as soon as it's flat. You have a few seconds to flatten it more before it cools down completely. You can use them as game tokens, or drill holes in them and make bag tags or necklaces.


tie-dye

I had a 10 year old in my care this week, so I finally had an excuse to try tie-dyeing. I bought a Tie Dye Kit and a bunch of t-shirts. We watched the DVD that came with the kit, and the girls picked their favorites folds. We had enough t-shirt to try all the basic folds: spiral, "bull's eye" (best on bandanas!), vertical and horizontal stripes and crinkle.

Here's what we've learned. Tie-dye is fun, easy, and the results are great. The girls were very happy with their t-shirts and proudly wore them the next day, telling everyone that they've made them themselves.

The kit came with everything we needed: dyes, soda ash, rubber bands and gloves (and a DVD and instructions, of course). I used the regular kitchen gloves, because they stay on better, especially on the small kids' hands. In addition to the kit, you will also need gallon size ziplock bags, one per each item you paint.

The process was not very messy, but it took a long time, and there were a lot of "Are the t-shirts ready?" We made some Jello while the folded shirts were pre-soaking in soda ash solution.

We had t-shirts of different quality, all brand new, the best results were on 95% cotton/5% spandex t-shirts from Target; the worst on 50/50 cotton from Hanes. We also dyed worn, washed, not-so-white-anymore socks, and these turned out great. 

We painted 10 t-shirts, two pairs of socks, bandana and a hand towel. And there still was some dye left. The dyes have to be used within 2 weeks of mixing, so if the package says that you can paint 10-15 shirts, make sure to get that many.


Here are some of the t-shirts we made:

a) two-color spiral.

b) two-color vertical stripes (stripes are the easiest to make)


c) three-color spiral.

d) three-color horizontal stripes.

Portable Dollhouse

Kids like small things. And kids like to play with miniature versions of real life objects. So, sooner or later you end up with a box full of small dolls, animals, furniture and accessories. You might go and get a dollhouse, or if you are like me, you might decide to make one instead.

This is our recent project. The Dollhouse. It took only an hour to put it together. It's portable. It's cat proof (can be closed and put away). It does not take a lot of space, and is easy to clean up: all pieces stay inside the suitcase when the playtime is over.

Here's how we made it. Take one cardboard suitcase. We had a medium size one, and the room is spacious enough for two kids to play together at the same time, or to use larger furniture, if you wish.

We used a Calico Critters Deluxe Kitchen Set.


Open the suitcase. Line the "floor" with some scrap paper or newspaper, trace along the perimeter. Take another sheet of paper and repeat for the "wall". Take it out, carefully cut along the lines. Now you have your templates.

Take some construction paper, scrapbook paper or contact paper, trace the templates, cut out carefully. Affix the "flooring" first, using double sided tape or glue. Open and close the suitcase a few time to create the crease. 

I used the Contact cork for the floor. The result is nice and cork is more resistant to scratches, but it will be more difficult to remove, should I ever change my mind.


Glue the "wallpaper". I used a sheet of scrapbooking paper. I glued it on with the regular school glue.

Arrange the furniture. You may use a double sided tape or a mounting tape to affix the pieces to the "floor" and/or "walls".

I think I'll make a "window" to put above the sink/counter. To do this, you can either buy a Dollhouse window or just make a pair of curtains and a small picture (aka "the view"), and glue this onto the wall.

The only thing left now it to invite some toys over for a house warming party. Enjoy!

Rocket Science

Preschoolers may be too young to understand the Third Law of Motion, but they still have a lot of fun watching Alka-Seltzer rockets soar. Forget about paper templates, to make a rocket easy enough for a small child to handle, all you need is:

- clear air-tight plastic canister (e.g. film canister) - rocket's body
- stickers, permanent markers, etc - to decorate your rocket (optional)
- Alka-Seltzer ORIGINAL pill, broken into 4 pieces - rocket fuel
- water
- flat surface in the open area (e.g. driveway, patio) - launch pad

1) Turn your can lid-side down. Decorate the rocket, making sure that you can put the lid on and off easily.
2) Go to your launch pad, make sure there is no breakable things within 6 ft (2 meters) off the launching area.
3) When ready to launch, put 2 tablespoons of water in the rocket, put 1/4 of Alka-Seltzer pill into the water, QUICKLY snap the lid on, turn the rocket right-side up and set it on the launch pad. DO NOT try to pick up your rocket up once you set it down for launch.
4) Step away! Count backwards from 10. And watch your rocket take off.

Once your rocket has launched, collect the rocket, cap and leftover fuel. Clean it up, and it's ready to go again.

Crochet flower pattern

I see more and more things for little girls decorated with crochet flowers. Dresses, hair accessories, bags, scarfs - most anything nowadays gets decorated with crochet flowers.  It's very cute, romantic and very "homey", but a pair of hair barrettes with crochet flowers can cost as much as $5! There's no way I'm going to pay that much for something my daughter will lose right after leaving the house.

If you know how to crochet -just basic stitches, really- you can make your own flowers in just a few minutes. And then you can decorate your little girl's things. Not only she'll look trendy but she'll be proud to tell everyone that her mom  (grandma, aunt...) made these for her.

I don't know how to write the crochet patterns, so I've made a chart instead:


Notes: Use two different colors to make a "daisy", or use one color and sew a button in the middle.
I recommend using mercerized cotton yarn as it's very strong and "shiny". It also washes well.

Making a Lid-Bot.

Hello.
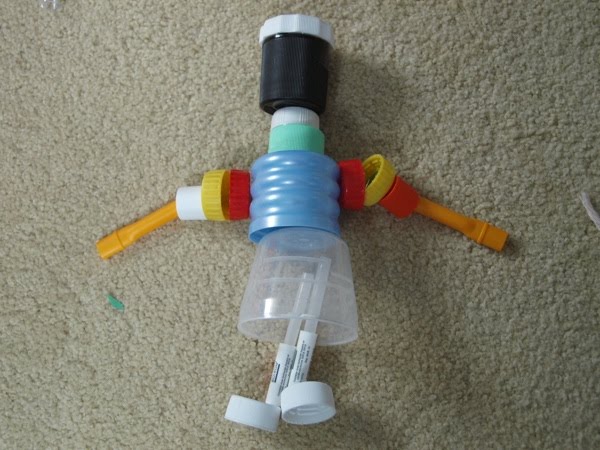
We've had a family craft time this week. We made a Lid-bot, which is a robot, made from lids.

We'd been waiting to do this project for a long time, since it took a while to collect a basket full of lids and caps. The original inspiration came from Lidmen. Actually, I wanted to make a puppet, but the assembly of the robot took longer than expected, and it was too much for kiddo.

All you need is:
-bunch of caps/lids, big and small
-thread
-drill

Learning from our first try, I would recommend pre-drilling the lids before calling your child over. Let your child design a lid-bot by laying the pieces on the table (or rug). It also helps to take a picture of the layout before you start the assembly, this way if it gets messed up or you get interrupted, you'll still remember what the original plan was.  Once you pre-drill the holes, your child can help you thread the lids on to the strings. You can also use permanent markers to draw a face or decorations on your 'bot. You can even spray paint the whole thing, if you like.


These are the pictures of the 'bots layout we tried. This was the kiddo's favorite part! Most of our lids are from soda/juice/water bottles, the larger ones are from the spices, deodorant, shaving cream, the girl bot's skirt is from the laundry detergent; we also used straws from old sippy cups for making limbs and inside the lidbot's chest to connect his stomach to his neck.

Overall, it's a fun family project, that costs nothing. The design possibilities are endless. But you WILL get addicted to lid collecting. 


Happy crafting!

(photos by Mamalya)

Calendar

"I never tried this today" "Are we there yet?" "Is it tomorrow now?" Small kids have no sense of time. Presenting them with a visual calendars seems to help a lot.

We first started to make our calendars in December. There were simply too many things scheduled for little N. to keep track of: Birthday, Party (try to explain to a 4 yo why these two are not on the same day!), Holidays, School show, etc... So we made a Block calendar. We took a "post-it" block, counted out 31 pages. Then we helped N. to write the numbers on each page, and then we drew pictures that symbolized the event. It was a success. There were no more questions about "when" and "why not now". She also loved being in charge of the calendar, taking a leaf off every morning.

Now we do monthly calendars. With a space for a picture (either to color or to draw, depending on what we feel like). The order of the events and the idea of time are not the only things that kids learn when they make their own calendars. They can practice counting, writing, drawing or coloring; they learn days of the week and months. You can also count how many days are until the special event.

TIP:  For the younger kids, fill in some of the numbers and/or use a yellow highlighter to write the numbers for them to trace.

"Magic" for kids

This is a very simple project to do with your kids.
It's called "Thaumatrope". You can explain to the kids that this is how animation works, or you can just call it a "magic trick". Spinning the thaumatrope is a good exercise for little hands. It helps to improve a eye-hand coordination.

Print out the template or make your own design and follow the directions below.
You will need:
-Paper
-Pencil
-Glue or scotch tape.

1. Print out the template.

2. Cut out the circles. If your child is old enough to work with scissors, let her do that herself.

3. Align the circles back-to-back. Put it on the window or against the light to check that the butterflies are above the flower.

4. Glue the circles together.

5. Insert a pencil.

6. Use a piece of scotch tape to secure the pencil.

7. Hold it between your palms. "Grind" your palms again each other. And watch the new [combined] image appear as the thaumatrope spins.

Have fun!


(images by Mamalya)

Meaningful activities

I find it challenging to find "activities" for my child. I have to compete with her Montessori school. She does not want toys, she wants activities, preferably meaningful ones. Who wants to play pretend cooking when you can help make meatballs or pancake batter!?

So today I'll share a couple of activities we did with her last week. Our first activity was loop loom weaving. We went to a craft store and got a loop loom and a bag of loops. The cotton loops were too tight, we had to stretch them in order to make weaving easier. This was a fun activity per se.
She got an over-under-over-under pattern quickly and we made a potholder. Overall, it was a fun experience, and something a child could definitely do with little help or supervision. It's easy to keep the tension right comparing to a peg loom. I wonder if it is possible to weave using a string of yarn instead of the loops. We have a ton of old t-shirts that we are planning to cut into strips for future weaving projects. And I will make a peg loom just to have her try it.

Another activity repotting the violets. We bought two pots on our recent trip to IKEA for the violets that outgrew their small pots. So it was time for them to get new bigger ones. I did not even get a pot and a plant yet, when N. was already waiting for me armed with a plastic spade. She enjoyed scooping soil and putting it into the pot. Meanwhile we discussed the gardening plans for the summer. She asked if she could have a flower garden of her own. And I said "yes", because I remember my own "garden" (a 4 in wide strip of dirt alongside of the greenhouse in my grandparents' garden) and how fond and proud I was of it.

I prepped the plants, and potted them while N. ran and got our watering can and some water, then she carefully watered the flowers. She truly enjoyed the whole experience.

(images by Mamalya)
 
Creative Commons License
Sestrenki by sestrenki.blogspot.com is licensed under a Creative Commons Attribution-Noncommercial-Share Alike 3.0 United States License