Showing posts with label holidays. Show all posts

Complete me.

The kiddo is going to have a "gift exchange" at school for the Valentine's day. Since, most of the parents shop for V-day goodies at the same big-box store, we try to come up with something a bit more original (and sugar free). And it has to be something you can make cheaply, fast, in large quantities (we have 30 kids in the class this year) and with a "help" of a 5 yo.

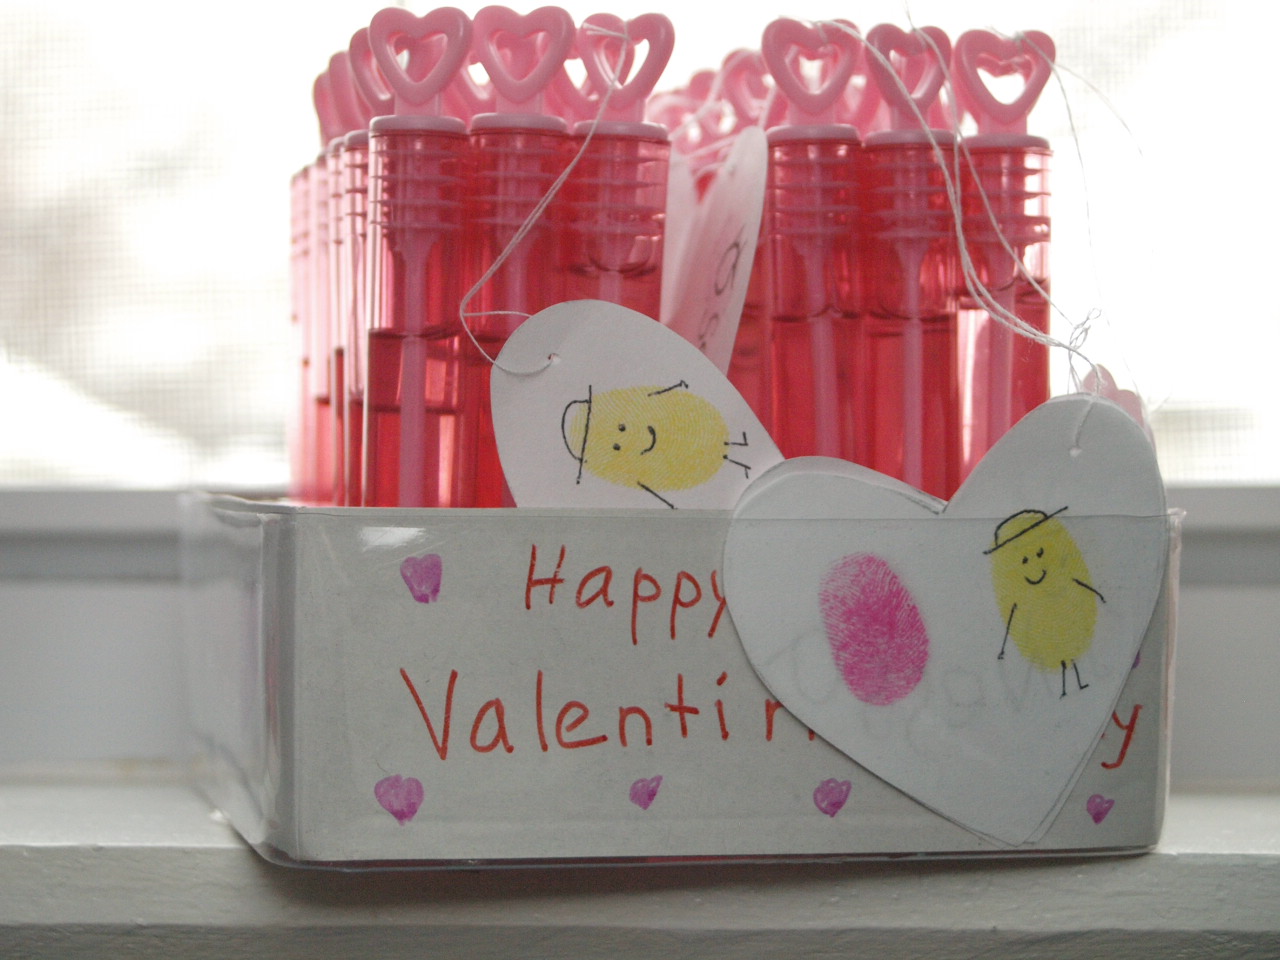
Small kids love bubbles almost as much as they love candy; so we decided to go with bubble wands again. They were a big hit last year. I got a pack of pink bubble tubes with heart tops at the wedding aisle at the craft store (who cares that it was intended to be a wedding day favor!? Stuff at THAT aisle is more tasteful than what's sold for the V-day).

Then we made tags. We cut out small hearts, and did two thumbprints on each. We drew faces on one print, leaving the other one unfinished. I hope that the kids will draw on it after they get the bubbles. [by the way, the Thumbprint drawing book was a huge hit with my daughter] 
I thought of writing "complete me", but 3-5yo aren't good at V-day humor. The back side of the tag has Kiddo's name.

We managed to squeeze in a small math lesson - skip counting by 5. We put finished tags in the piles, 5 hearts each. And then counted by 5. I was trying to make a point that skip counting allows you to count faster.
Attach the tags to the bottle tops with a piece of string.
We even decorated the box.
Ta-da!

The crazy party.

We were looking for a low-key in-house Birthday party idea for our 5yo daughter. We were to have a dozen of kids from 4 to 11yo, so we needed something that would work for all of them. My idea was to make a giant ball pit.

We took out all the furniture from the bedroom, and rented over 5 000 plastic balls. (I wanted to buy them and found a manufacture, but they were sold out)
First of all, it took a while to find a party rental place that had that many balls. Also, we spent about 12 man-hours washing them as they were way too dirty. Anyway...

It was a huge success, and that's what matters. The kids had a ball (pun intended). It was very loud at times, but there were no whining or bored kids! Now the kiddo wants the balls to come back every year. I'm not so sure about that.
[PS: that's only about 2K of balls on that picture.]

Another hit was the dining table covered with sheets of drawing paper. There were some crayons for the kids to doodle with (safer option for drawing on the table than pencils or markers). It was as practical as it was fun. At some point one side of the table got too dirty, so I just replaced that sheet of paper.

We also had a self-serve sprinkles for the cupcakes, and the kids loved that as well. Non-pareils are the glitter of the baking world, so expect the mess.

thrifty Holidays 101: garland

Gingerbread men garland from mailing paper
This was my favorite cutting activity when I was in kindergarten. You can say, that I was abscessed with folding the paper, drawing 1/2 silhouettes and cutting them, unfolding to see what I've got.

It's super easy. If you woke up and remembered that you were in charge of classroom decorations, and the party is today - you can still make it! Here's how to.

1) Find a piece of paper that's as long as you want your garland to be. Note, that if your garland is longer that 10 Gingerbread men, it might be too difficult to cut through that many layers of paper.  
2) Decide how wide you want your design to be. 
3) Fold the paper back and forth like accordion (fan fold). Draw your design on the top layer. You can either draw the whole Gingerbread man or just a 1/2 of it.  Make sure their hands are touching at the folded edge. If you're making a very long garland, you can make a wider folds and draw 2 men, or Gingerbread man and a Snowman.
4) Cut out your garland, being sure not to cut the fold lines under the hands.
5) Open up the garland. 
6) Iron it with a hot iron with steam turned off.
7) For extra credit, decorate the Gingerbread men. 

Happy Hanukah

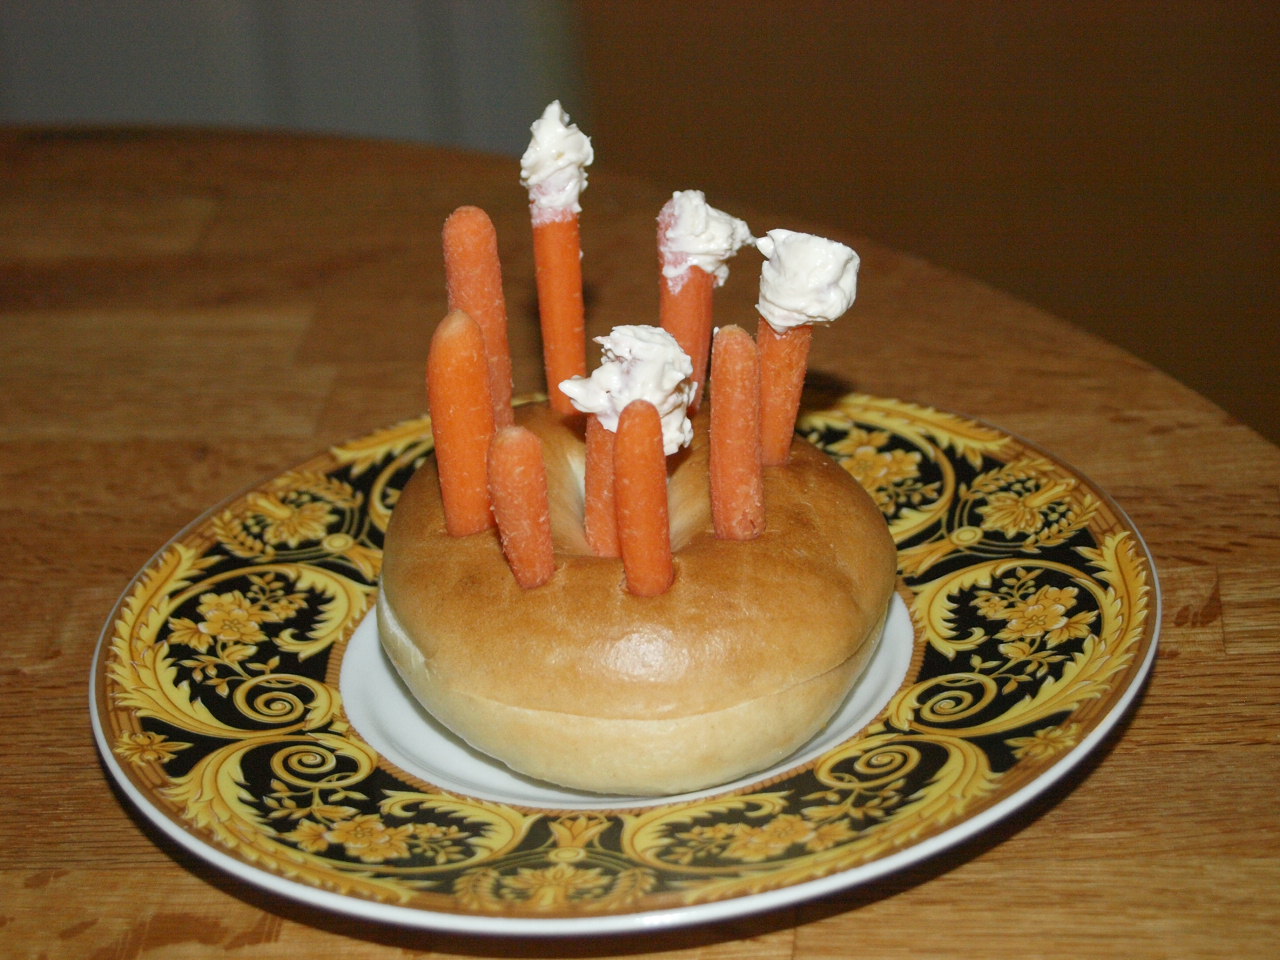
This is a Menorah bagel we made as a Hanukah snack. Our little one is allergic to eggs among other things, and there aren't that many traditional Hanukah foods she can have. But I just wanted to point out that a little out-of-box thinking can turn the plain snack of bagel and carrots with some dip into a unique, festive (ok, maybe not so festive, but attractive) dish. I think it will also work for kiddo's Birthday. :-)

Very easy holiday cards

Here are two simple ideas for Holiday cards your 3-5 yo can make with minimum help. Another hidden benefit of kid-made card is that they are so cute you don't have to write a message! A simple "Happy New Year" scribbled by your preschooler is more than enough.


Draw (or have your child draw) a simple tree shape (a triangle over a small rectangle).

Cut construction paper (scraps left over from some other project are perfect) into tiny pieces, the smaller the better.

Starting at the bottom of the tree, apply glue row by row, put the paper pieces on, apply more glue, keep going until you're done.

Draw a tree-topper or make one from paper pieces.

Scribble a short note inside the card (write it on a piece of paper so your child could copy it).

Make as many cards as you need. Mail them to friends and family.


And here are the cards we made last year (with almost-4-yo.).

Scribble a snowman (or a Xmas tree). Use the stick-on foam mosaic pieces to decorate it.

wear your heart


Little N. is going to have a Valentine's day party at school tomorrow. Due to the snow storm, the school has been canceled for two days, so we wanted to make up for that and make Friday feel extra special. May be we should celebrate at home tomorrow too, because I'll be on a trade show on Sunday (this, by the way, is supposed to be the greatest expo ever, so come back on Monday to read about it.).

These felt button covers from Martha Stewart website were my original inspiration. But N. does not have white shirts yet.

So we decided to use the heart that I crocheted some time ago. I think I've used the instructions from Skip to my Lou.

And of course, we'll be taking her Valentines with her. Thanks, Ohdeedoh for featuring our cards today. You are always so kind to our little projects.

making Valentines


We have just finished making Valentines for little N.'s classmates. Little kids appreciate trinkets more than a sophisticated card with a thoughtful message. And all kids like bubbles, don't they!?

For the "mind-blowing Valentines", you will need:
-bubbles in tubes ($10/48 tubes) Sold at Walmart, craft stores and party stores as wedding favors;
-construction paper;
-scissors;
-optional: crayons, markers, stickers, glitter to decorate the hearts.

Fold the paper in half, draw the heart shape. You can also draw a butterfly. It works beautifully.

Cut the shape out.

Cut the slots for the tube: make two parallel cuts (about 1/8" apart) at the right angle to the grease line.

Open the heart and weave the tube down into one slit and up through the other.

Write the child's name and decorate the heart if desired.

Tinker Tree


The tinker tree I've made for my daughter's room was featured on Ohdeedoh.com:

And as if the tree weren't enough, this homemade little crochet piggy is just about killing us with the cuteness.

Thanks Ohdeedoh. You've made my day.

(image: Mamalya)
 
Creative Commons License
Sestrenki by sestrenki.blogspot.com is licensed under a Creative Commons Attribution-Noncommercial-Share Alike 3.0 United States License